Planit Pro: Photo Planner
- 4.6
- Rating
- 10.00K
- Installs
- $9.99
- Price

 Analysis by App-foxy
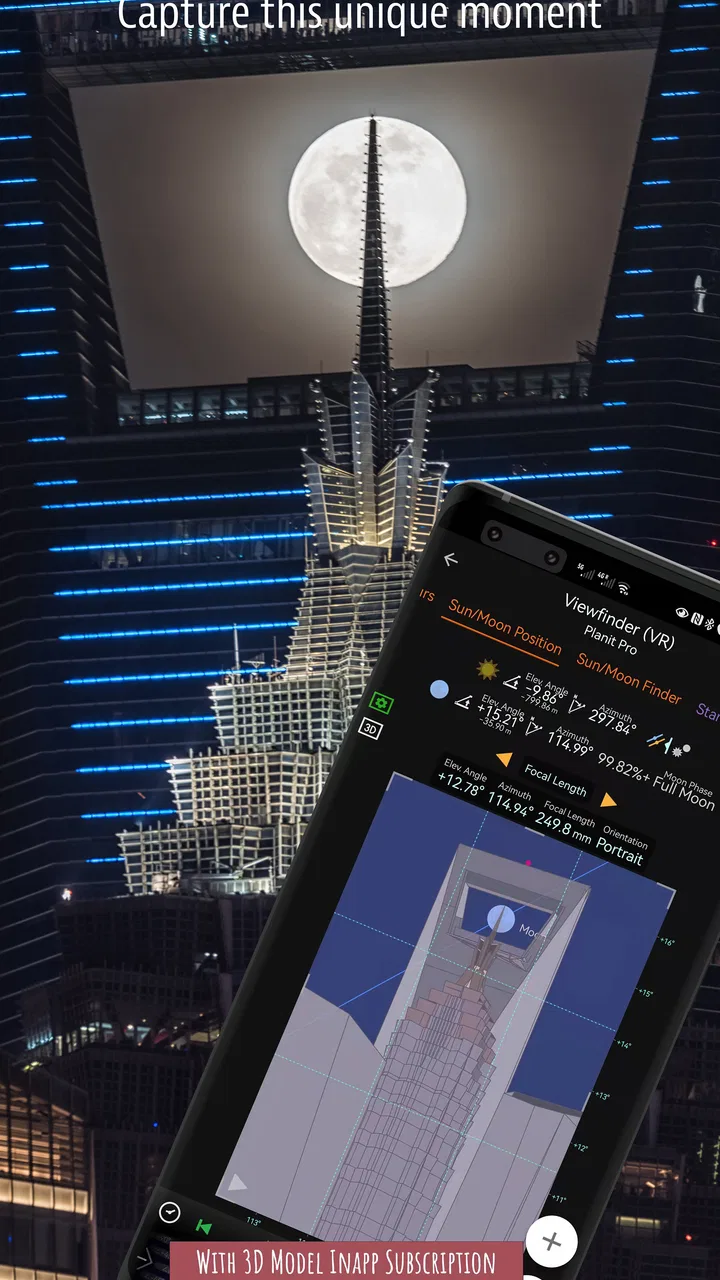
If you enjoy photographing landscapes, the hardest part is often not pressing the shutter. It is being in the right place, facing the right direction, at the right moment. Planit Pro: Photo Planner is built around that problem. I found it most useful as a planning tool for photographers who want to think through a scene before leaving home, rather than relying on luck once they arrive.
This is a photography app from JIDE Software, and its focus is much narrower than that of a general camera or photo editor. You will not open it to apply a quick filter to a portrait. Instead, you use it to explore a location, consider how the sun and other natural elements may line up, and make a practical plan for a landscape shoot. That focus makes it appealing to serious outdoor photographers, but it also means the app takes a little patience before it feels natural.
The app is priced at $9.99, with optional in-app purchases ranging from $0.99 to $99.99 per item. Its age rating is Everyone, and it runs on devices using Android 7.0 or later. The current version is 11.0.17. Those details matter because this is not the sort of app I would install casually for a single afternoon; its value appears when I return to it for repeated planning.
You May Also Like

 AccuWeather: Weather Radar
AccuWeather Review: A Quick, Clear Forecast for Everyday Decisions
For everyday plans, the best forecast is the one you can understand quickly. AccuWeather makes rain timing, radar, and local conditions easy to act on, with a few trade-offs.

 Hill Climb Racing
Why Hill Climb Racing Still Turns Crashes Into One More Run
A tiny car, a bumpy hill and one more upgrade: Hill Climb Racing keeps resurfacing because its simple chaos makes every near-miss feel personal.

 AliExpress - Shopping App
AliExpress Makes Global Shopping Feel Personal, but Shoppers Bear the Risk
AliExpress turns a global marketplace into a pocket-sized discovery engine. Its reach is useful, its shopping loop compelling, and its trade-offs easy to miss.

 Lords Mobile: Kingdom Wars
Lords Mobile Is a Kingdom-Building Routine, Not a Quick Match
A case-by-case verdict on the building, battles, device demands, and social commitments that make Lords Mobile rewarding for some players and exhausting for others.

 PDF Scanner app - TapScanner
TapScanner Makes Paperwork Easier to Capture, Check, and Share
TapScanner makes scanning with a phone feel less like a rescue operation and more like a dependable step in getting work done. Its capture tools are useful, though not flawless.

 Block Blast!
 Shows How Much a Puzzle Game Can Leave Out
A quiet grid game shows why puzzle players increasingly value instant clarity, repeatable skill and low-pressure play—and where the genre still needs to catch up.
More From Our News Desk
View All News

What to expect before planning a shot
The first thing I would tell a new user is to treat this as a visual planning workspace, not a simple compass. The appeal lies in combining a map-based view with photographic thinking. I can begin with a place I already know, search for a viewpoint, or investigate a destination before committing to a trip. The result is a more deliberate process than opening a standard map and guessing where the light might fall.
That distinction also explains why the app may feel more involved than familiar alternatives. A normal map is excellent for roads, directions, and finding a general area. A weather app is better for checking clouds or temperature. A camera app is designed for capture. Planit Pro sits between those habits, helping me connect location and timing with the composition I want to make.
For example, imagine I am planning a visit to a lake with a distinctive ridge behind it. I can think about the foreground, the direction of the ridge, and the position I need to stand in before I leave. Instead of arriving at sunrise and discovering that the light comes from behind the mountain, I can use the planning stage to decide whether the trip is worthwhile or whether another date and viewpoint make more sense.
The biggest benefit is fewer wasted trips, especially when the subject is far away or the useful light lasts only briefly. Landscape photography often involves early starts, long drives, and conditions that cannot be repeated easily. A planning app cannot guarantee a great photograph, but it can remove some avoidable uncertainty.
The average rating is 4.6 from around 1,200 ratings, with around 175 written reviews and over 10,000 installs. I see those figures as a sign that the app has found a specific audience rather than trying to serve every kind of photographer. It is not necessarily the best choice for someone who only takes spontaneous phone photos, but that narrow purpose is a strength for people who want more control over outdoor compositions.
Who will get the most from it
I would recommend it to photographers who regularly shoot mountains, coastlines, city skylines, lakes, monuments, or other fixed subjects. It is particularly useful when the scene depends on direction and timing. If I know the exact rock, building, or peak I want in the frame, planning becomes much more valuable than it would be for a casual walk with a camera.
It can also help beginners learn how landscape composition works. A new photographer may understand that golden-hour light is attractive but still struggle to connect that idea with a real location. Working through a planned scene encourages better questions: Where will I stand? What will be in the foreground? Which direction will I face? Will the subject be separated from the background? Those questions are more useful than simply waiting for a colorful sky.
I would skip it if my main interest is editing images, recording video, or taking quick snapshots without a fixed subject. It is also not a replacement for checking the practical conditions of a trip. A carefully planned alignment does not tell me whether a trail is open, whether the viewpoint is safe, or whether the weather will cooperate. I still need ordinary travel preparation and current local information.
Getting through the first setup without feeling lost
On first opening the app, I suggest resisting the urge to explore every control immediately. Start with one familiar location. A nearby park, bridge, shoreline, or hill is better than an ambitious holiday destination because you already understand what the scene looks like. The goal of the first session is not to create a perfect expedition plan. It is to learn how the app represents a place and how its planning tools fit together.
Begin by locating the subject you want to photograph. Be precise about the subject rather than choosing only the general town or region. If I am interested in a particular peak, I want the map view centered on that peak and the surrounding terrain, not merely on the nearest parking area. This small decision affects every later judgement about direction and position.
Next, identify a plausible camera position. I find it helpful to choose a spot where I could realistically stand, rather than placing the viewpoint in an attractive but inaccessible area. A plan is only useful when it respects the actual landscape. Even when I am working from home, I try to imagine the route, the distance from the subject, and whether the foreground will be clear.
One of the less obvious lessons is that the app encourages me to plan from the subject backward. Many beginners start with a favorite overlook and then hope the light works. I prefer to start with the visual result: the subject centered or offset, a particular ridge behind it, and a desired direction of light. From there, I consider whether my chosen viewpoint can produce that arrangement. This approach turns the map into a composition tool rather than just a navigation screen.
It is worth keeping a simple note beside the app during the first few sessions. I write down the subject, intended viewpoint, approximate shooting time, and what I expect to see. That makes it easier to compare the plan with reality later. If the scene fails, I can tell whether the issue was the location, the timing, the weather, or my assumptions about the landscape.
A realistic first outing
Here is the workflow I would use for a first meaningful test. Suppose I want to photograph a church tower across a field at dawn. I choose the tower as the subject, find a public viewpoint across the field, and examine the direction from the viewpoint toward the tower. I then explore different dates and times to see whether the planned light direction supports the mood I want.
Before leaving, I save or record the useful details in a way I can revisit easily. I also check the route separately, because a photographic plan does not remove the need for normal travel planning. On location, I compare the real scene with the plan and make small adjustments. The purpose is not to obey the screen blindly. It is to arrive with a strong starting point and enough understanding to adapt.
That first outing is important because it reveals the difference between theoretical alignment and a finished photograph. Trees may block part of the view. The subject may look smaller than expected. A foreground that seemed promising on the map may be visually messy. These are not failures of the app; they are reminders that planning supports field judgement rather than replacing it.
For a beginner, success can be as simple as arriving early enough, standing in the intended area, and understanding why the light is moving through the scene the way it is. Once that connection becomes clear, later plans become faster and more ambitious.
How I avoid the most common confusion
The most common confusion is expecting the app to produce a finished composition automatically. It can help me reason about a scene, but it cannot decide whether a composition feels balanced, whether a foreground is distracting, or whether the moment has emotional impact. I still need to use my eyes and, ideally, visit the location before an important shoot.
Another source of friction is confusing a promising direction with a guaranteed result. Even if the light comes from the desired side, clouds, haze, reflections, and local obstructions can change the photograph completely. I treat every plan as a probability and a preparation aid. That mindset prevents disappointment and leaves room for creative changes in the field.
Map precision can also create false confidence. A line that looks perfect on a screen may not correspond to an open path or a clear view. In practice, I use the app to narrow down possibilities, then verify access and visibility through local knowledge, previous visits, or other mapping resources. This combination is much safer than trusting a single screen.
New users may also wonder whether they need advanced photography knowledge before using it. I do not think they do. It helps to understand basic ideas such as foreground, subject direction, and the difference between front light and backlight, but the app can be used as a learning aid. I would start with one simple subject and avoid changing several variables at once.
Making the planning habit more efficient
After the first successful outing, I would create a repeatable checklist. I first choose the subject, then a realistic viewpoint, then the desired direction and time. After that, I consider access, likely obstructions, and whether the scene still makes sense if conditions change. This sequence keeps me from spending too long adjusting a plan that was based on an impractical viewpoint.
A useful advanced habit is to prepare two versions of the same shoot. The primary plan might depend on a clear view toward a distant subject, while the backup plan uses the same area for a closer detail or a different direction. This is where the app becomes more than a one-time alignment calculator. It helps me think in alternatives, which is essential when landscape conditions are unpredictable.
I also recommend planning around the photograph rather than around the app. Once I understand the intended result, I can stop looking at the screen and pay attention to the actual scene. Constantly checking the map during a shoot can make me miss changing light or overlook a better composition nearby. The best workflow is to prepare beforehand, use the plan as a reference, and then work freely once I arrive.
Compared with a general-purpose photography app, the trade-off is clear. A camera app gives me immediate capture controls, while an editing app helps polish the file afterward. Neither one is designed to answer the location-and-timing questions that matter before a landscape shoot. Compared with a standard map, this app offers a more photographic way to think, but it demands more learning and does not replace route or safety information.
Compared with simply checking sunrise and sunset times, it offers more context because the direction of light matters as much as the clock. A time alone does not tell me whether the subject will be illuminated from the front, edge, or rear. Still, I would combine it with a weather service and local checks rather than expecting one app to cover the entire outing.
When the price makes sense
At $9.99, I would judge the purchase by how often I photograph planned landscapes. For someone who makes only occasional spontaneous images, a free map and basic timing information may be enough. The paid price becomes easier to justify when a single missed opportunity involves travel, accommodation, or a rare seasonal view.
The optional purchases, ranging from $0.99 to $99.99 per item, are another reason to look carefully at the way I intend to use the app. I would begin with the core experience and decide whether the workflow genuinely improves my photography before spending more. A new user does not need to turn the first session into a technical project.
Because the app is rated for Everyone, it is approachable from an age-rating perspective, but that does not mean every control will feel immediately simple. The challenge is conceptual rather than inappropriate content. I needed to think like both a photographer and a planner, and that combination takes a little practice.
My recommendation after using it as a planning tool
Planit Pro: Photo Planner is a specialized choice, and I think that is exactly how it should be judged. Its strongest value appears before the camera comes out: choosing a viewpoint, imagining the relationship between subject and light, and arriving with a reason for being in a particular place at a particular time.
I would recommend it to landscape photographers who are willing to plan and learn. It is especially worthwhile for distant subjects, sunrise or sunset sessions, and locations where a small change in position can transform the composition. I would not recommend it as a general photography companion for casual snapshots, nor would I use it alone for navigation, weather, or safety decisions.
My best advice for a first-time user is simple: choose a nearby subject, make one modest plan, and test it in real conditions. Do not worry about mastering every option before taking that first step. Once you see how a planned direction and viewpoint relate to the scene in front of you, the app’s purpose becomes much clearer. For me, that is the point at which it stops feeling like a complicated map and starts feeling like a practical part of a landscape photography routine.
FAQs for Planit Pro: Photo Planner
01What is Planit Pro: Photo Planner used for?
Planit Pro: Photo Planner is a planning tool for photographers who want to prepare landscape, travel, night-sky, and outdoor shoots in advance. It combines maps, location information, sun and moon calculations, Milky Way planning, weather details, and augmented-reality tools to help you understand where and when a scene may look its best before arriving at the location.
02Does Planit Pro support sun, moon, and Milky Way planning?
Yes. The app is designed to calculate the position and movement of the sun, moon, and Milky Way for a selected location and date. This can help you plan sunrise and sunset compositions, moon photography, star trails, and astrophotography sessions. Results depend on accurate map positioning, date and time settings, and suitable local visibility conditions.
03Can Planit Pro be used for finding and planning photography locations?
Planit Pro includes map-based planning features that allow you to examine potential viewpoints, landmarks, terrain, and shooting directions. You can save locations and organize ideas for future trips, which is useful when scouting unfamiliar areas. However, digital maps cannot replace checking access restrictions, private property rules, parking availability, safety conditions, and local regulations.
04Does Planit Pro work offline?
Some planning information may remain available after it has been loaded or saved, but offline functionality can vary depending on the feature, map source, and device. Internet access may be needed for downloading map data, retrieving weather information, searching places, or using certain online services. It is recommended to prepare your plans before leaving and avoid relying on the app as your only navigation tool.
05Is Planit Pro suitable for beginners, and does it require payment?
The app can be useful for beginners, but its many astronomical, mapping, and photography controls may take time to understand. It is particularly valuable for users who regularly plan outdoor shoots and want more precise information than a basic weather or compass app provides. Planit Pro is generally offered as a paid photography planning application, so check the current store listing for price, supported devices, and any in-app purchase details before downloading.
Pros
- Accurate sun
- moon
- and Milky Way planning tools for outdoor shoots.
- Interactive maps make it easy to scout viewpoints before traveling.
- Supports multiple map layers
- including terrain and satellite views.
- Useful notifications help track upcoming golden-hour and astronomical events.
- Saved plans can streamline preparation for repeat photography locations.
Cons
- Many advanced planning features require a paid subscription or purchase.
- The interface can feel dense for photographers new to planning apps.
- Detailed astronomical calculations may consume extra battery during field use.
- Offline map availability may be limited depending on the selected region.
- Some features work best with a stable GPS signal and internet connection.

Planit Pro: Photo Planner
Gallery